
.png)
Azure Foundry Agents: OpenAPI 3.0 specified tool and Azure Functions
- Javith Abbas
- Feb 28
- 4 min read

Updated: Mar 1
When I began this journey, my goal was straightforward: connect an Azure Foundry agent to an Azure service using an API. However, as is often the case in software development, the details proved challenging. While Azure offers powerful tools like the Model Context Protocol (MCP) and Azure Queue Storage, neither suited my needs. MCP lacked the direct access I required, and queue-based solutions weren't ideal for the real-time integration I was pursuing.
That’s when I turned to Azure Functions and OpenAPI. By creating an HTTP-triggered Azure Function in C#, documenting it with an OpenAPI 3.0 specification, and securing it with API key authentication, I successfully bridged the gap between my Foundry agent and the Azure service. In this post, I’ll share the technical details of my implementation and the lessons I learned along the way.
Why Azure Functions and OpenAPI?
The Azure MCP Server is excellent for exposing tools to Foundry agents, but it wasn’t an option for my use case because it doesn’t support direct access to the Azure service I was working with (which I’ll refer to as the "mystery service"). I needed a flexible and extensible way to connect the agent to this service, and that's where Azure Functions came into play.
Azure Functions allowed me to:
- Create a lightweight, serverless API endpoint for my custom logic.
- Securely connect to the mystery service via API calls.
- Scale seamlessly with traffic from my Foundry agent.
Using OpenAPI, I could:
- Define a clear, machine-readable contract for how the agent interacts with the function.
- Leverage Foundry’s support for OpenAPI tools with minimal setup.
- Secure the integration using API key authentication.
Comparing Integration Methods: MCP, Queue Storage, and OpenAPI
Before diving into implementation, it’s essential to understand when to use each integration method in Azure AI Foundry:
Model Context Protocol (MCP) -
When to use: For synchronous, real-time interactions requiring immediate responses.
Why choose it: MCP simplifies tool hosting and promotes reusability across platforms. However, it’s limited when direct access to certain Azure services is needed.
Azure Queue Storage -
When to use: For asynchronous workflows and background processing.
Why choose it: Queue-based tools are resilient and prevent the agent’s reasoning loop from being blocked by long-running tasks, but they aren’t suitable for real-time API integrations.
OpenAPI 3.0 Specified Tools -
When to use: For integrating existing HTTP-based APIs or web services.
Why choose it: OpenAPI provides a standardized way to describe APIs, supports multiple authentication methods, and enables seamless integration with Foundry agents.
For my use case, OpenAPI was the clear choice because I needed real-time interaction with an existing API.
Building the HTTP-Triggered Azure Function
The first step was to create an Azure Function to handle API requests from the Foundry agent. Here’s how I approached it:
Step 1: Create the Function
I created a new HTTP-triggered Azure Function in C#. Below is a simplified version of the function code
using System.IO;
using Microsoft.AspNetCore.Mvc;
using Microsoft.Azure.WebJobs;
using Microsoft.Azure.WebJobs.Extensions.Http;
using Microsoft.AspNetCore.Http;
using Newtonsoft.Json;

public static class MyFunction
{
    [FunctionName("MyFunction")]
    public static async Task<IActionResult> Run(
        [HttpTrigger(AuthorizationLevel.Function, "post", Route = null)] HttpRequest req)
    {
        string requestBody = await new StreamReader(req.Body).ReadToEndAsync();
        dynamic data = JsonConvert.DeserializeObject(requestBody);

        // Custom logic to interact with the mystery service
        var response = new { message = "Success", data = data };

        return new OkObjectResult(response);
    }
}
Step 2: Hosting Recommendations
To ensure optimal performance:
I hosted the function on the Flex Consumption Plan, which offers scale-to-zero hosting and mitigates cold-start latency with "Always Ready" instances.
I enabled VNet integration to securely access the mystery service.
Documenting and Securing the API with OpenAPI 3.0
Next, I documented the function with an OpenAPI 3.0 specification and secured the endpoint
Step 1: Define the OpenAPI Specification
Here’s an example of the OpenAPI spec I created:
{
  "openapi": "3.0.0",
  "info": {
    "title": "My Azure Function API",
    "version": "1.0.0"
  },
  "paths": {
    "/MyFunction": {
      "post": {
        "summary": "Handles requests from Foundry agent",
        "operationId": "MyFunction",
        "requestBody": {
          "required": true,
          "content": {
            "application/json": {
              "schema": {
                "type": "object",
                "properties": {
                  "data": { "type": "string" }
                },
                "required": ["data"]
              }
            }
          }
        },
        "responses": {
          "200": {
            "description": "Success",
            "content": {
              "application/json": {
                "schema": {
                  "type": "object",
                  "properties": {
                    "message": { "type": "string" },
                    "data": { "type": "object" }
                  }
                }
              }
            }
          }
        }
      }
    }
  },
  "components": {
    "securitySchemes": {
      "apiKeyHeader": {
        "type": "apiKey",
        "name": "x-api-key",
        "in": "header"
      }
    }
  },
  "security": [
    {
      "apiKeyHeader": []
    }
  ]
}
Step 2: Secure the API
I opted for API key authentication for simplicity:
I generated a function key in Azure Functions.
I stored the key securely in an AI Foundry connection as a custom key.
Register the Tool in Azure AI Foundry
Finally, I registered the tool in the Azure AI Foundry portal:
Add the Tool
Navigate to the agent configuration and select `Add` under the Actions pane.
Choose `OpenAPI 3.0 specified tool`.
Provide Details
Name the tool and describe its functionality.
Paste the OpenAPI spec from Step 2.
Configure Authentication
If using Managed Identity, select it as the authentication method and provide the Audience value (Application ID URI).
If using API Keys, select `Connection` and choose the custom keys connection where the key is stored.
Once registered, the agent automatically invoked the tool when appropriate, sending HTTP requests to the Azure Function and using the responses to guide its reasoning.
Lessons Learned
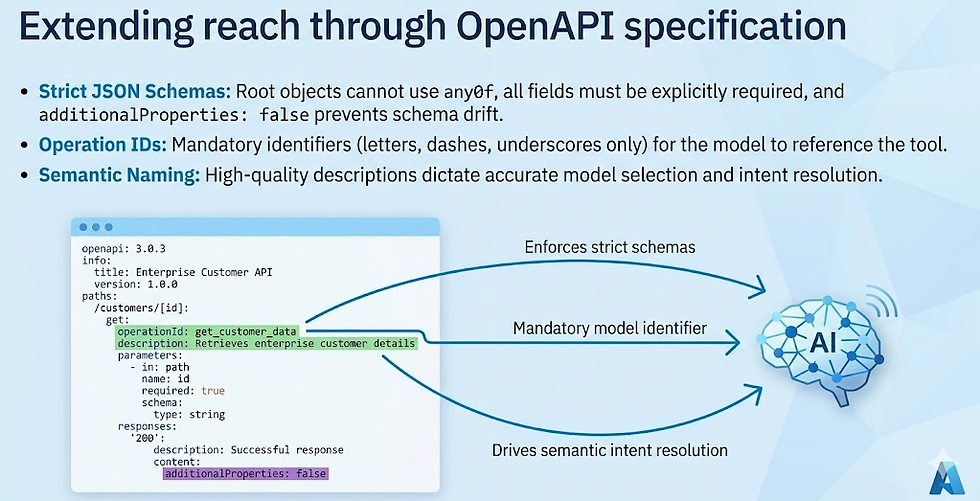
Strict OpenAPI and JSON Schema Rules
Azure AI Foundry enforces a subset of JSON Schema rules. I had to adjust the OpenAPI spec to:
- Use single concrete types (no `string | null` unions).
- Avoid unsupported keywords like `anyOf` and `oneOf`.
- Set `additionalProperties: false` for all objects.
Testing Is Key I extensively tested the integration with mock data to catch schema validation issues early. Tools like Swagger Editor were invaluable.
Mitigating Cold Starts Hosting the function on the Flex Consumption Plan with "Always Ready" instances significantly reduced cold-start latency.


Comments